
2009年04月21日
SLの視界3
前回までは視距離だけ変更し、画質は最高品質設定のままでした。今回はプリセットされているUltra、High、Mid、Lowを使いました。
距離はそれぞれ256m、128m、96m、64mに自動的にセットされます。画質の影響を一番受けるのは、水面の表現のようです。
Ultraだけ水面に写り込みがあります。HighとMidは木の影が消えている以外は殆ど同じ。遠方に物がないのでHighとMidの差はわからない。
Lowは極端に画質が落ちるので、水が主な景色には適していないようです。
At the previous reports, only the view distance was changed and the picture quality was kept at the top level. This time, I used the preset, Ultra, High, Mid, and Low. The view distance is adjusted automatically to 256m, 128m, 96m, and 64m accordingly. Water surface is most affected by the picture quality. With Ultra, there is a reflection seen on the water surface. The High and Mid are almost same since there is no object in the distance. The Low degrades the quality drastically, and will not be suitable to see water.

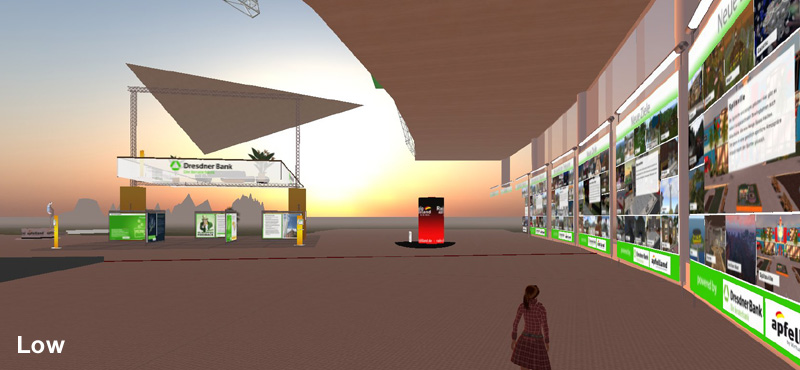
前回の繰り返しだけど、近くのものを見るにはLowが有効なことがあります。下はドイツの空港で、私が経験した一番重いSIMのひとつです。
ロビーの一階、二階の周囲にある小さい写真は、全部テレポパッドになっていて、都市や商店街に直接飛べます。
残念ながらドイツ語だけで、日本のSIMはひとつもなかった。
As reported last time, the Low could be effective when objects nearby are important. The below is a German airport, which is one of the heaviest SIMs I ever visited. The numerous small pictures on the wall of the first and second floors of the lobby are all teleportation pads. Unfortunately the language is Germany and there is no Japanese SIM.

ここへ飛んだ直後はほとんどの写真がグレーの板になっていて、全部読み込むにはかなり時間がかかります。
表示をLowにすれば、自分の前のパネルだけすぐ読むことが出来る。動くのも楽です。
When arrived at this spot, all pictures are shown as gray panels, and it takes a while to read all textures. By using Low, the panels in front can be seen soon, and also it makes easy to move around.
距離はそれぞれ256m、128m、96m、64mに自動的にセットされます。画質の影響を一番受けるのは、水面の表現のようです。
Ultraだけ水面に写り込みがあります。HighとMidは木の影が消えている以外は殆ど同じ。遠方に物がないのでHighとMidの差はわからない。
Lowは極端に画質が落ちるので、水が主な景色には適していないようです。
At the previous reports, only the view distance was changed and the picture quality was kept at the top level. This time, I used the preset, Ultra, High, Mid, and Low. The view distance is adjusted automatically to 256m, 128m, 96m, and 64m accordingly. Water surface is most affected by the picture quality. With Ultra, there is a reflection seen on the water surface. The High and Mid are almost same since there is no object in the distance. The Low degrades the quality drastically, and will not be suitable to see water.

前回の繰り返しだけど、近くのものを見るにはLowが有効なことがあります。下はドイツの空港で、私が経験した一番重いSIMのひとつです。
ロビーの一階、二階の周囲にある小さい写真は、全部テレポパッドになっていて、都市や商店街に直接飛べます。
残念ながらドイツ語だけで、日本のSIMはひとつもなかった。
As reported last time, the Low could be effective when objects nearby are important. The below is a German airport, which is one of the heaviest SIMs I ever visited. The numerous small pictures on the wall of the first and second floors of the lobby are all teleportation pads. Unfortunately the language is Germany and there is no Japanese SIM.

ここへ飛んだ直後はほとんどの写真がグレーの板になっていて、全部読み込むにはかなり時間がかかります。
表示をLowにすれば、自分の前のパネルだけすぐ読むことが出来る。動くのも楽です。
When arrived at this spot, all pictures are shown as gray panels, and it takes a while to read all textures. By using Low, the panels in front can be seen soon, and also it makes easy to move around.


Posted by Temi at 15:21│Comments(0)
│撮影技法